09 July, 2019
How to install steam on Debian 10 (Buster)
Note: console commands are listed as bold and italic.
Ensure that contrib and non-free are added to your sources.list (/etc/apt/sources.list). I've provided an example of mine below:
deb http://mirror.aarnet.edu.au/debian/ buster main contrib non-free
deb-src http://mirror.aarnet.edu.au/debian/ buster main contrib non-free
deb http://security.debian.org/debian-security buster/updates main contrib non-free
deb-src http://security.debian.org/debian-security buster/updates main contrib non-free
# buster-updates, previously known as 'volatile'
deb http://mirror.aarnet.edu.au/debian/ buster-updates main contrib non-free
deb-src http://mirror.aarnet.edu.au/debian/ buster-updates main contrib non-free
update your apt cache with sudo apt update. If all goes well, you can install your non-free grapohics driver, which in my case is nVidia.
with sudo apt install nvidia-driver
Since the Steam client is a 32bit application we will also need to enable the i386 architecture in apt.
use dpkg --add-architecture i386 since we've made a change to apt, you'll need to update your apt cache again with sudo apt update.
Finally install the nvidia-driver-libs-i386 package with sudo apt install nvidia-driver-libs-i386.
You should end up with both the 64bit and 32bit nvidia libraries, which should look similar to this:
dpkg -l | grep nvidia-driver
ii nvidia-driver 418.74-1 amd64 NVIDIA metapackage
ii nvidia-driver-bin 418.74-1 amd64 NVIDIA driver support binaries
ii nvidia-driver-libs:amd64 418.74-1 amd64 NVIDIA metapackage (OpenGL/GLX/EGL/GLES libraries)
ii nvidia-driver-libs:i386 418.74-1 i386 NVIDIA metapackage (OpenGL/GLX/EGL/GLES libraries)
ii nvidia-driver-libs-i386:i386 418.74-1 i386 NVIDIA metapackage (OpenGL/GLX/EGL/GLES 32-bit libraries)
Finally, we can install steam with sudo apt install steam.
04 July, 2017
Active Directory Users and Computers filter for disabled computer accounts
Use the following LDAP filter shows all the disabled computers in a particular OU:
(&(objectCategory=computer)(userAccountControl:1.2.840.113556.1.4.803:=2))
To filter out disabled computers, showing only active objects use this:
(&(objectCategory=Computer)(!(userAccountControl:1.2.840.113556.1.4.803:=2)))
(&(objectCategory=computer)(userAccountControl:1.2.840.113556.1.4.803:=2))
To filter out disabled computers, showing only active objects use this:
(&(objectCategory=Computer)(!(userAccountControl:1.2.840.113556.1.4.803:=2)))
08 June, 2017
Distribution Point Pre-Requisits
Installing a Distribution Point for ConfigMgr (SCCM) can be as simple as adding a site server and selecting the distribution point role, most of the time the install is flawless but it can take what feels like as ice age to complete as ConfigMgr will install IIS and the other pre-requisits.
Myself, I prefer to pre-install the pre-requisits myself to speed up the installation process.
If, like me your impatient then add the features/roles below for a basic distribution point.
Myself, I prefer to pre-install the pre-requisits myself to speed up the installation process.
If, like me your impatient then add the features/roles below for a basic distribution point.
- Remote Differential Compression
- Background Intelligent Transfer Service (BITS)
- Web Server (IIS)
- IIS Configuration:
- Application Development:
- ISAPI Extensions
- Security:
- Windows Authentication
- IIS 6 Management Compatibility:
- IIS 6 Metabase Compatibility
- IIS 6 WMI Compatibility.
20 January, 2016
Adding .NET 3.5 to Windows 10 with DISM
Adding the .NET Framework 3.5 to Windows 10 can sometime prove problematic at best as W10 can throw numerous errors back at you when attempting to add the feature via the GUI.
The simplest solution (and to prevent hair loss) is to use DISM.
Open an elevated command prompt and enter the following command:
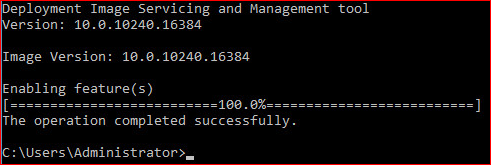
DISM /Online /Enable-Feature /FeatureName:NetFx3 /All /LimitAccess /Source:d:\sources\sxs
The /Source argument is used to specify the install location for the side by side folder on your installation media. This folder can also be located on a network share of your choice.
If everything runs as it should, DISM will respond as shown below:
Checking the features list via the GUI will now present you with the good news:

12 January, 2016
How to Export Drivers Using Powershell in Windows 8.1 and above
In Windows 8.1 Update 1 there appeared a new Powershell cmdlet Export-WindowsDriver,
that allows to export all the installed third-party drivers
(non-Microsoft ones) directly from the Driver Store. The news is
excellent, since earlier to export and backup the drivers, you had to
use third-party apps, like DoubleDriver, DriverMax, etc.
So, to export all the installed
third-party drivers in Windows 8.1, run the Powershell console under the
administrator privileges and enter the following command:
Export-WindowsDriver –Online -Destination c:\export-drivers
Note: The driver files are saved to directory c:\export-drivers. It must be created in advance.
If you have to export drivers from the offline Windows image mounted,
for instance, to c:\win8_image, the command looks like this:
Export-WindowsDriver -Path c:\win8_image -Destination c:\export-drivers
After you run the cmdlet, the data on the exported drivers that are not a part
of the system will be displayed on the screen.

When the export is over, some folders with the name of the corresponding
INF files of the drivers appear in the specified folder.


To display the list of all exported drivers in a convenient form with the indication of the class, vendor and the driver version, let’s export the drivers with the two commands:
$BackupDrivers = Export-WindowsDriver -Online -Destination c:\export-drivers
After that let the results be displayed in the table:
$BackupDrivers | Select-Object ClassName, ProviderName, Date, Version | Sort-Object ClassName

| The drivers from this archive can be distributed to other systems either manually or automatically with DISM, PowerShell, MDT, SCCM, etc. |
note: this post was copied verbatim from http://woshub.com/how-to-export-drivers-using-powershell-in-windows-8-1-u1/
and is reproduced here for my use.
28 September, 2015
How to resolve the issue: “A website wants to start a remote connection. The publisher of this remote connection cannot be identified.”
Often you receive this message when you try to run your remote applications, even though you have all the certificates in place and they are configured properly. You might ask “I have already signed my application with the trusted certificate and my web single sign-on (SSO) is working fine, so why I am receiving this error message?”
The answer: Although you have signed in the application by using the trusted certificate, the client computer needs the Secure Hash Algorithm 1 (SHA1) certificate thumbprints that represent trusted Remote Desktop Protocol (RDP) file publishers.
There are two ways that you can configure your computers so that you don’t see this error message again.
Method 1: Create a GPO with RDP signing settings (permanent fix)
You can create a Group Policy object (GPO) by using the following settings from your domain controller and push that policy to all the client computers that are trying to access the remote application.
Locate the SHA1 thumbprint
1. To find the SHA1 thumbprint, click Start, click Run, type mmc, and then click OK.
2. On the File menu, click Add/Remove Snap-in.
3. In the Available snap-ins box, click Certificates, and then click Add.
4. In the Certificates snap-in dialog box, select Computer account, and then click Next.
5. In the Select Computer dialog box, click Local computer: (the computer this console is running on), and then click Finish.
6. In the Add or Remove Snap-ins dialog box, click OK.
7. In the Console tree, expand Certificates (Local Computer), expand Personal, and then click Certificates.
8. Double-click the certificate that you want to use.
9. In the Certificate Properties dialog box, on the Details tab, click Thumbprint. The thumbprint number will appear in the box (example: 25 1a 22 02 b3 6d b6 f0 64 0b db 8d b5 4a bb 99 0f bc ed af).
10. Copy the thumbprint number, making sure that you don’t include the space in front of the number, and then click OK. (For example, if the number starts with 74…, start copying from the “74.”)

Add the SHA1 thumbprint to the Group Policy setting
1. On the domain controller, open the Group Policy Management Console (GPMC). You can open the GPMC in one of two ways:
- Click Start, point to Administrative Tools, and then click Group Policy Management Console.
- Click Start, click Run, type gpmc.msc and then click OK or press ENTER.
2. Go to the location of the Group Policy setting: | < user>\Policies\Administrative Templates\Windows Components\Remote Desktop Services\Remote Desktop Connection Client.


4. Click Enabled, and then in the Comma-separated list of SHA1 trusted certificate thumbprints box, enter the SHA1 thumbprint of the certificate that you use for signing your remote applications or RemoteApp programs (i.e., paste the thumbprint number that you copied from the Certificates Properties page), and then click OK.
Note: Make sure that when you paste the number, there isn’t a space in front of it.

5. After enabling this policy setting on all the client computers, you should no longer receive the error message.
Method 2: Change logon settings (temporary fix)
1. When you log on to the RD Web Access web page, you have an option to choose whether you are on a public or a private computer.

2. Select This is a private computer, and then click Sign in.
3. You will still see the prompt, but this time when the security warning appears, select the Don’t ask me again for remote connections to this computer check box, and then click Connect.
4. The error message should disappear the next time you open the remote application or RemoteApp program.

note: this post was copied verbatim from the Microsoft terminal services blog located at (http://blogs.msdn.com/b/rds/archive/2011/04/05/how-to-resolve-the-issue-a-website-wants-to-start-a-remote-connection-the-publisher-of-this-remote-connection-cannot-be-identified.aspx)
18 March, 2015
Creating an MSI transform (.mst) file with Orca
Orca is a tool that allows you to edit an MSI file’s
properties. With Orca, you can easily add customized text, add/remove
installation screens, or even change certain conditions contained with
the original MSI file.
You can download a copy of Orca from: http://www.technipages.com/download-orca-msi-editor.html.
Steps:
You can download a copy of Orca from: http://www.technipages.com/download-orca-msi-editor.html.
Steps:
- Open Orca.
- Open the original MSI. File > Open > Browse to the MSI > Click Open.
- Start a new transform. Click on the top “Transform” menu, and select “New Transform”.
- Make changes. Navigate to a table you want to edit, and modify values.
- Generate the transform file. Click on the top “Transform” menu, and select “Generate Transform”.
- Save the transform file. Enter in a name for the transform file, and click “Save”.
To run the transform:
In
In
cmd, type:msiexec /i TRANSFORMS=
For example:
msiexec /i orca.msi TRANSFORMS=transformOrca.mstthis post was copied from Tony's TLE blog post (http://tonyle.ca/blog/?p=33)and re-posted here for my own reference.
Subscribe to:
Posts (Atom)